标签: objectvie-c AuotLayout
布局方式
AutoLayout
Masonry使用AutoLayout布局方式,使用一组约束,构成一个一次方程来计算出视图的x,y,width,heigth。确定视图的约束属性有:
NSLayoutAttributeLeft(视图左边)
NSLayoutAttributeRight(视图右边)
NSLayoutAttributeTop(视图上边)
NSLayoutAttributeBottom(视图底边)
NSLayoutAttributeLeading(视图前边,与左边含义一样)
NSLayoutAttributeTrailing(视图后边,与右边含义一样)
NSLayoutAttributeWidth(视图宽度)
NSLayoutAttributeHeight(视图高度)
NSLayoutAttributeCenterX(视图水平居中)
NSLayoutAttributeCenterY(视图垂直居中)

以下使用默认值与View有关

NSLayoutAttributeRightMargin
NSLayoutAttributeTopMargin
NSLayoutAttributeBottomMargin
NSLayoutAttributeLeadingMargin
NSLayoutAttributeTrailingMargin
NSLayoutAttributeCenterXWithinMargins
NSLayoutAttributeCenterYWithinMargins

NSLayoutRelationLessThanOrEqual(小于等于) NSLayoutRelationEqual(等于) NSLayoutRelationGreaterThanOrEqual(大于等于)

图中设置RedView的leading约束,公式为:RedView的左边与BlueView的右边的距离为8,这样就确定了RedView的左边位置也就确定了RedView的x坐标位置。使用AutoLayout布局视图时,所设置的约束必须能够让布局引擎计算出视图的x,y坐标与width和height,才能正确的显示视图。对于UIButton、UILabel、UIImageView来说,这些固件有intrinsic content size,只要设置了内容,那么其大小就固定了,所以使用AutoLayout布局时,只需要约束其左边与右边。intrinsic content size可以重写get方法,返回自定义的大小。UIView有一个layoutMargins属性,用于指定视图和它的子视图之间的边距。默认是{8,8,8,8},但是如果是viewController的root view则top和bottom的margins为0,左右margins可能是16或者20,这取决于当前的view尺寸,并且不能修改。
每一条约束都有优先级, 用于存在多套约束的情况下,解决约束冲突问题,优先级范围为1-1000,数值越大,优先级越高,高优先级的约束会覆盖低优先级的约束。
[subView mas_makeConstraints:^(MASConstraintMaker *make) {
    make.top.equalTo(superView).offset(10);
    make.left.equalTo(superView).offset(8).priorityMedium();
    make.right.equalTo(superView).offset(-8).priorityMedium();
    make.height.mas_equalTo(100);
    make.width.mas_equalTo(50).priorityHigh();
}];
上例中,设置了左右约束,就能确定视图的宽度,如果设置优先级,在布局时就会产生冲突,AutoLayout不知道怎么布局视图的宽度。设置宽度的优先级之后,布局时则会优先满足视图的宽度约束。在AutoLayout中,有:Content Compression Resistance和Content Hugging,分别为抗压缩与抗拉伸,其优先级从1-1000,默认为750。分为水平和垂直两个方面,抗压缩的值越高,视图越不容易被压缩,值越低视图越容易受到压缩;抗拉伸类似。
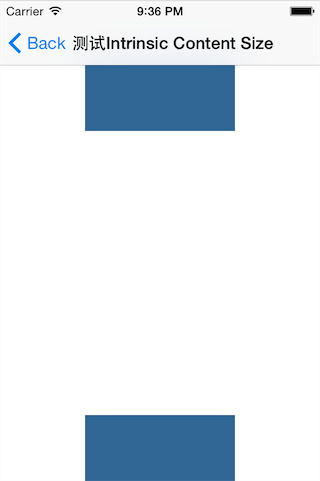
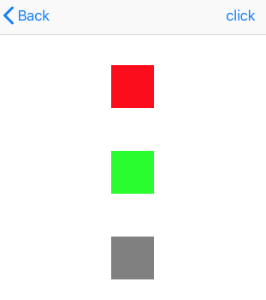
抗拉伸测试:为了测试内容吸附优先级我们在页面上添加两个View,分别是topView和bottomView,设置他们都水平居中,然后分别和页面的顶部和底部对齐:
UIView *topView = [UIView new];
topView.backgroundColor = [UIColor colorWithRed:.2 green:.4 blue:.6 alpha:1];
[self.view addSubview:topView];
[topView mas_makeConstraints:^(MASConstraintMaker *make) {
    make.centerX.mas_equalTo(self.view);
    make.top.mas_equalTo(self.mas_topLayoutGuideBottom);//和导航栏底部对齐
    make.width.height.mas_equalTo(50);
}];

UIView *bottomView = [UIView new];
bottomView.backgroundColor = [UIColor colorWithRed:.2 green:.4 blue:.6 alpha:1];
[self.view addSubview:bottomView];
[bottomView mas_makeConstraints:^(MASConstraintMaker *make) {
    make.centerX.mas_equalTo(self.view);
    make.bottom.mas_equalTo(self.mas_bottomLayoutGuideBottom);//和页面底部对齐
    make.width.height.mas_equalTo(50);
}];
运行结果:
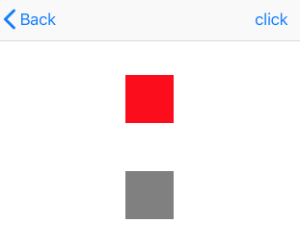
下面设置topView.bottom + 40 = bottomView.top,这样在运行的时候其实是会有冲突的,height约束与top约束冲突了。
设置后结果:
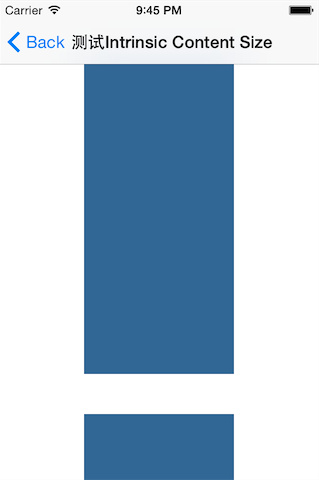
从运行结果来看,topView显示被拉伸了,如果想要topView正常显示不被拉伸:
[topView setContentHuggingPriority:UILayoutPriorityRequired forAxis:UILayoutConstraintAxisVertical];
除了这种方法,还可以使用优先级,来解决冲突,设置bottomView的width和height的优先级最高,设置topView的width和height优先级比bottomView低即可,这样AutoLayout会优先满足bottmView的高度与宽度大小。
UILayoutGuide
iOS9之后出来的,其直接依赖NSLayoutAnchor实现,属性有:
NSLayoutAnchor属性
/* Constraint creation conveniences. See NSLayoutAnchor.h for details.
 */
@property(readonly, strong) NSLayoutXAxisAnchor *leadingAnchor;    //x坐标
@property(readonly, strong) NSLayoutXAxisAnchor *trailingAnchor;
@property(readonly, strong) NSLayoutXAxisAnchor *leftAnchor;
@property(readonly, strong) NSLayoutXAxisAnchor *rightAnchor;
@property(readonly, strong) NSLayoutYAxisAnchor *topAnchor;    //y坐标
@property(readonly, strong) NSLayoutYAxisAnchor *bottomAnchor;
@property(readonly, strong) NSLayoutDimension *widthAnchor;    //宽
@property(readonly, strong) NSLayoutDimension *heightAnchor;    //高
@property(readonly, strong) NSLayoutXAxisAnchor *centerXAnchor;
@property(readonly, strong) NSLayoutYAxisAnchor *centerYAnchor;
@property(readonly, strong) NSLayoutYAxisAnchor *firstBaselineAnchor;
@property(readonly, strong) NSLayoutYAxisAnchor *lastBaselineAnchor;
这种布局方式相对AutoLayout来说,非常简洁。官方例子:
// Creating constraints using NSLayoutConstraint
[NSLayoutConstraint
 constraintWithItem:subview
 attribute:NSLayoutAttributeLeading
 relatedBy:NSLayoutRelationEqual
 toItem:self.view
 attribute:NSLayoutAttributeLeadingMargin
 multiplier:1.0
 constant:0.0].active = YES;

[NSLayoutConstraint
 constraintWithItem:subview
 attribute:NSLayoutAttributeTrailing
 relatedBy:NSLayoutRelationEqual
 toItem:self.view
 attribute:NSLayoutAttributeTrailingMargin
 multiplier:1.0
 constant:0.0].active = YES;

// Creating the same constraints using Layout Anchors
UILayoutGuide *margin = self.view.layoutMarginsGuide;
[subview.leadingAnchor constraintEqualToAnchor:margin.leadingAnchor].active = YES;
[subview.trailingAnchor constraintEqualToAnchor:margin.trailingAnchor].active = YES;
应用
(1)在superView上纵向放置两个subView,使得两个子视图与父视图间的垂直间距和子视图之间的垂直间距始终相等,无论两个子视图的大小如何变化,图黑线长度。
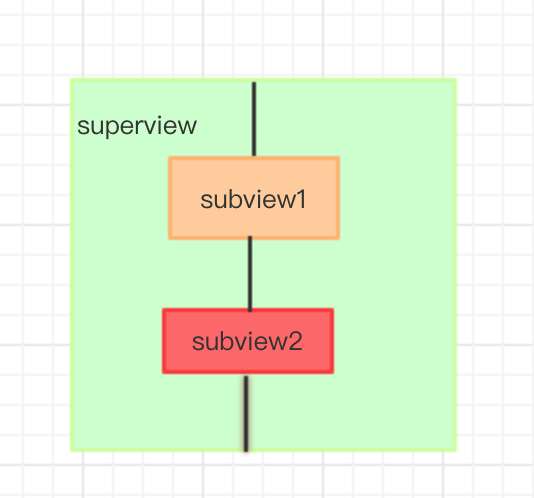
- 使用UILayoutGuide
subView1.translatesAutoresizingMaskIntoConstraints = NO;
subView2.translatesAutoresizingMaskIntoConstraints = NO;

UILayoutGuide *space1 = [[UILayoutGuide alloc] init];
UILayoutGuide *space2 = [[UILayoutGuide alloc] init];
UILayoutGuide *space3 = [[UILayoutGuide alloc] init];

[self.superView addLayoutGuide:space1];
[self.superView addLayoutGuide:space2];
[self.superView addLayoutGuide:space3];

[space1.topAnchor constraintEqualToAnchor:self.superView.topAnchor].active = YES;
[space1.bottomAnchor constraintEqualToAnchor:subView1.topAnchor].active = YES;

[space2.topAnchor constraintEqualToAnchor:subView1.bottomAnchor].active = YES;
[space2.bottomAnchor constraintEqualToAnchor:subView2.topAnchor].active = YES;

[space3.topAnchor constraintEqualToAnchor:subView2.bottomAnchor].active = YES;
[space3.bottomAnchor constraintEqualToAnchor:self.superView.bottomAnchor].active = YES;

[space1.heightAnchor constraintEqualToAnchor:space2.heightAnchor].active = YES;
[space2.heightAnchor constraintEqualToAnchor:space3.heightAnchor].active = YES;
- 使用AutoLayout
UIView *spaceView1 = UIView.new;
UIView *spaceView2 = UIView.new;
UIView *spaceView3 = UIView.new;
[self.superView addSubview:spaceView1];
[self.superView addSubview:spaceView2];
[self.superView addSubview:spaceView3];

[spaceView1 mas_makeConstraints:^(MASConstraintMaker *make) {
    make.top.equalTo(self.superView.mas_top);
    make.centerX.equalTo(self.superView);
    make.bottom.equalTo(subView1.mas_top);
    make.width.mas_equalTo(10);
    make.height.mas_equalTo(@[spaceView2, spaceView3]);
}];
[subView1 mas_makeConstraints:^(MASConstraintMaker *make) {
    make.top.equalTo(spaceView1.mas_bottom);
    make.centerX.equalTo(self.superView);
    make.height.equalTo(@100);
    make.width.equalTo(@100);
    make.bottom.equalTo(spaceView2.mas_top);
}];
[spaceView2 mas_makeConstraints:^(MASConstraintMaker *make) {
    make.top.equalTo(subView1.mas_bottom);
    make.centerX.equalTo(self.superView);
    make.bottom.equalTo(subView2.mas_top);
    make.width.mas_equalTo(@10);
    make.height.mas_equalTo(@[spaceView1, spaceView3]);
}];
[subView2 mas_makeConstraints:^(MASConstraintMaker *make) {
    make.top.equalTo(spaceView2.mas_bottom);
    make.centerX.equalTo(self.superView);
    make.bottom.equalTo(spaceView3.mas_top);
    make.height.equalTo(@50);
    make.width.equalTo(@50);
}];
[spaceView3 mas_makeConstraints:^(MASConstraintMaker *make) {
    make.top.equalTo(subView2.mas_bottom);
    make.centerX.equalTo(self.superView);
    make.bottom.equalTo(self.superView.mas_bottom);
    make.width.mas_equalTo(10);
    make.height.mas_equalTo(@[spaceView1, spaceView2]);
}];
比较:使用AutoLayout想保它们之间的距离始终相等,需要使用三个占位视图,并且隐藏,这样视图层级里多出三个占位视图,如果有消息产生,占位视图也会收到。使用UILayoutGuide则不需要占位视图避免了占位视图的缺点,且它不会出现在视图层级中,代码简洁易懂,但是只能运行在iOS 9以上。
(2) 使用Masonry自动撑起scrollView的高度
使用自动布局自动撑起视图的高度时,子视图不直接添加到scrollView上,而是添加到一个contentView,由它撑起scorllView的高度,原来scrollView的子视图变为contentView的子视图。对scrollView使用自动布局时牢记两点:
- UIScrollView自身的约束按照正常的视图添加。
- 内部子控件的约束不能按照UIScrollView来设置,同时必须完整,否则撑不起contentSize。
UIView* contentView = UIView.new;
[self.scrollView addSubview:contentView];
[contentView makeConstraints:^(MASConstraintMaker *make) {
    make.edges.equalTo(self.scrollView);
    make.width.equalTo(self.scrollView);
}];
UIView *lastView;
CGFloat height = 25;

for (int i = 0; i < 10; i++) {
    UIView *view = UIView.new;
    view.backgroundColor = [self randomColor];
    [contentView addSubview:view];
    [view mas_makeConstraints:^(MASConstraintMaker *make) {
        make.top.equalTo(lastView ? lastView.bottom : @0);
        make.left.equalTo(@0);
        make.width.equalTo(contentView.width);
        make.height.equalTo(@(height));
    }];
    height += 25;
    lastView = view;
}
[contentView makeConstraints:^(MASConstraintMaker *make) {
    make.bottom.equalTo(lastView.bottom);
}];
(3)在自动计算UITableViewCell高度中的使用
假定我们有如下需求:
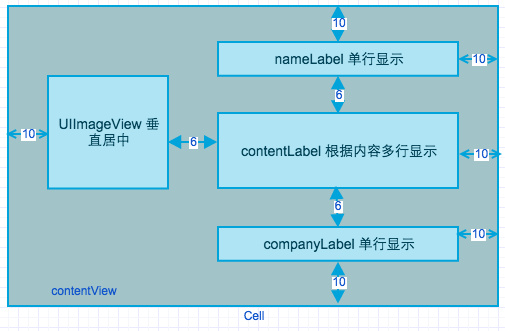
//图片距左边距离为10,上下居中
[_cellImageView mas_makeConstraints:^(MASConstraintMaker *make) {
    make.left.mas_equalTo(self.contentView).offset(10);
    make.centerY.mas_equalTo(self.contentView);
    make.top.mas_greaterThanOrEqualTo(self.contentView).offset(10);
    make.bottom.mas_lessThanOrEqualTo(self.contentView).offset(-10);
}];
//标题Label,一行显示
[_nameLabel mas_makeConstraints:^(MASConstraintMaker *make) {
    make.left.mas_equalTo(self.cellImageView.mas_right).offset(6);
    make.right.mas_lessThanOrEqualTo(self.contentView).offset(-10);
    make.top.mas_equalTo(self.contentView).offset(10);
}];
//内容label,多行显示
_contentLabel.numberOfLines = 0;
[self.contentView addSubview:_contentLabel];
[_contentLabel mas_makeConstraints:^(MASConstraintMaker *make) {
    make.left.mas_equalTo(self.nameLabel);
    make.top.mas_equalTo(self.nameLabel.mas_bottom).offset(6);
}];
//标题Label,一行显示
[_companyLabel mas_makeConstraints:^(MASConstraintMaker *make) {
    make.left.mas_equalTo(self.contentLabel);
    make.right.mas_lessThanOrEqualTo(self.contentView).offset(-10);
    make.top.mas_equalTo(self.contentLabel.mas_bottom).offset(6);
    make.bottom.mas_equalTo(self.contentView).offset(-10);//设定了这个自动计算cell高度时才知道具体cell的高度
}];

[_nameLabel setContentHuggingPriority:UILayoutPriorityRequired forAxis:UILayoutConstraintAxisVertical];
[_companyLabel setContentHuggingPriority:UILayoutPriorityRequired forAxis:UILayoutConstraintAxisVertical];
[_contentLabel setContentHuggingPriority:UILayoutPriorityRequired forAxis:UILayoutConstraintAxisVertical];
(4)优先级应用
在页面垂直排列三个视图,彼此之间相距一定距离,中间的视图可有可无,当中间视图存在的时候,三个视图正常排列;当中间视图消失时,底部视图上移至中间视图位置,或者距顶部视图一定距离。
初始位置:
新位置:
[self.topView mas_makeConstraints:^(MASConstraintMaker *make) {
    make.top.equalTo(self.view.mas_top).offset(100);
    make.centerX.equalTo(self.view);
    make.width.height.equalTo(@50);
}];
[self.midView mas_makeConstraints:^(MASConstraintMaker *make) {
    make.top.equalTo(self.topView.mas_bottom).offset(50);
    make.centerX.equalTo(self.view);
    make.size.equalTo(self.topView);
}];
[self.bottomView mas_makeConstraints:^(MASConstraintMaker *make) {
    make.size.equalTo(self.topView);
    make.centerX.equalTo(self.view);
    make.top.equalTo(self.midView.mas_bottom).offset(50);
    make.top.equalTo(self.topView.mas_bottom).offset(50).priorityHigh();
}];
(5)对某个视图,不在同的条件下,会有不同的约束。
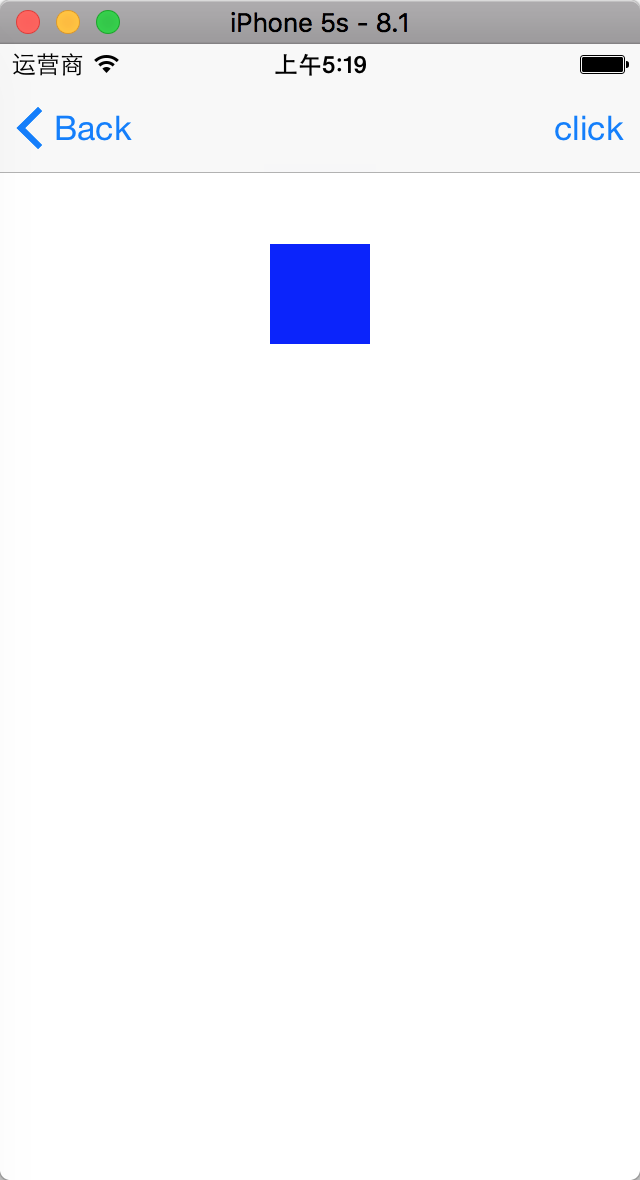
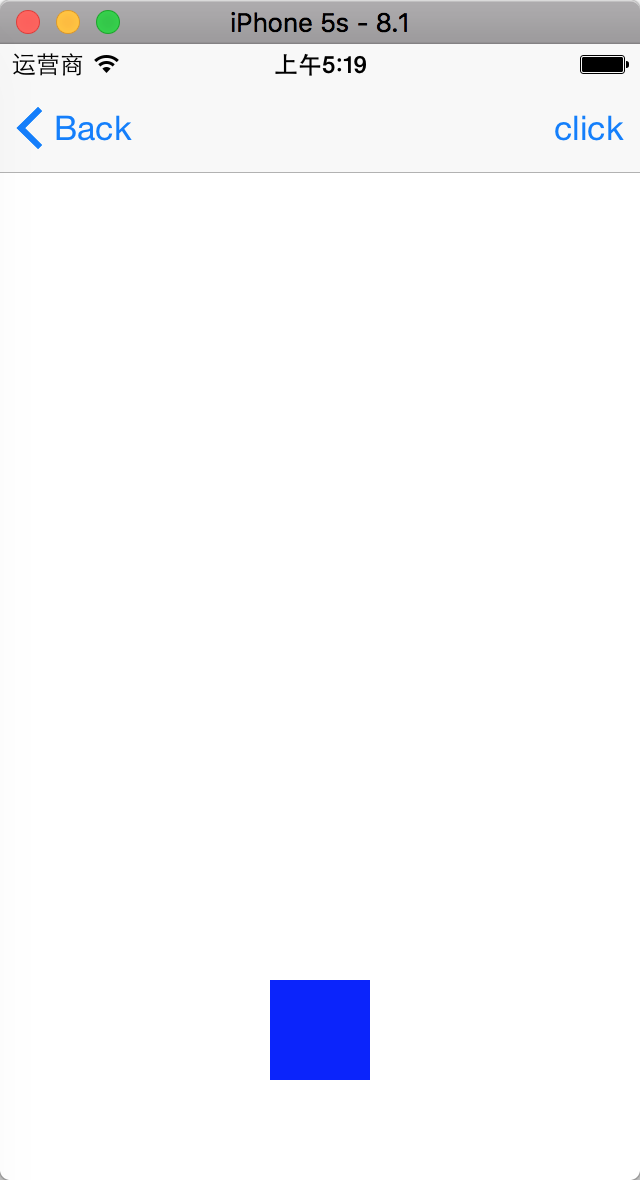
在ViewController中添加一个blueView,水平居中,初始状态为距ViewController的顶部一定距离,点击右上角按钮后,blueView移至相距ViewController底部一定距离处。
第一种情况:
第二种情况:
- 设置两套约束,代价较大。因为视图的水平位置不变,大小不变,变的只是Y方向的约束。使用两套约束的问题在于:对这些不变的约束先remove约束再add约束。
- 设置一套约束,持有Y方向上的两种益约束(需要设置两个约束的优先级),任何时刻,只有一个约束生效,避免了第一种方案的缺点。
UIView *subView = UIView.new;
subView.backgroundColor = [UIColor blueColor];
[self.view addSubview:subView];

[subView mas_makeConstraints:^(MASConstraintMaker *make) {
    self.topConstraint = make.top.equalTo(self.view).offset(100);
    make.width.height.mas_equalTo(50);
    make.centerX.equalTo(self.view);
    self.bottmConstraint = make.bottom.equalTo(self.view).offset(-50).;
}];
[self.bottmConstraint deactivate];
- (void)click
{
    self.isClick = !self.isClick;
    if (self.isClick) {
        [self.bottmConstraint activate];
        [self.topConstraint deactivate];
    } else {
        [self.bottmConstraint deactivate];
        [self.topConstraint activate];
    }
}
(6)topLayoutGuide、bottomLayoutGuide使用
iOS 7以后ViewController增加了这两个属性,tooLayoutGuide代表ViewController最顶部,除了状态栏和导航栏(如果有);bottomLayoutGuide代表ViewController最底部,除了tabbar(如果有)。
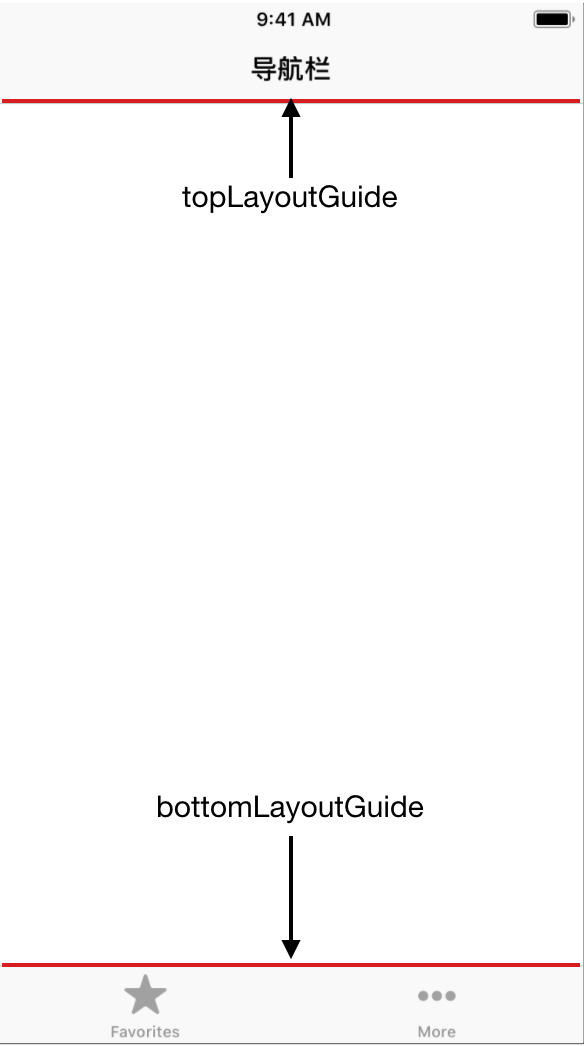
如果某个视图设置了topLayoutGudie对齐,那么在有导航栏的情况下视图的顶部总是紧跟在导航栏的底部,在没有导航栏的情况下视图的顶部紧跟在状态栏的底部,bottomLayoutGuide类似。设置这两个约束可以在布局视图的时候避开导航栏、状态栏和tabbar。这两个ViewController的属性,实质为两个虚拟的占位View。如:在ViewController上添加一个View宽和高均为50,水平居中,紧贴状态栏或者导航栏之下。
UIView *view1 = UIView.new;
view1.backgroundColor = [UIColor blueColor];
[self.view addSubview:view1];

[view1 mas_makeConstraints:^(MASConstraintMaker *make) {
    make.top.equalTo(self.mas_topLayoutGuide);
    make.centerX.equalTo(self.view);
    make.width.height.equalTo(@50);
}];
iOS 11又引入了一个Safe Area(安全区域)的概念,苹果建议在这个安全区域内放置UI控件。这个安全区域的范围其实就是整个屏幕隔离出状态栏,导航栏,tabar,以及iPhone X顶部刘海,底部虚拟home手势区域的范围。在iOS 11以后想要达到上述效果使用下面的代码:
[view mas_makeConstraints:^(MASConstraintMaker *make) {
   make.top.equalTo(self.view.mas_safeAreaLayoutGuideTop);
   make.centerX.equalTo(self.view);
   make.width.height.mas_equalTo(50);
}];
AutoLayout与Frame
使用AutoLayout时,视图的真实frame在方法layoutSubviews内可以得到,如果在设置好约束后是立即拿到frame,则要手动调用setNeedsLayout和layoutIfNeeded,不手动调用时三个有时layoutIfNeeded不会调用,但在UITableViewCell和UICollectionViewCell中,layoutIfNeeded一定会调用,且cell内的子控件的真实frame只有在layoutIfNeeded方法中才能得到,在layoutSubviews得不到真实的frame,要需要设置好约束后,某些代码想要用视图的frame,则必需要放在layoutIfNeeded中,因为此手动调用setNeedsLayout和layoutIfNeeded方法后,在layoutSubviews方法中不能得到frame。